Archive for the ‘Breakfast’ Category

Avocado, cherry tomato, and cucumber salad with red pepper and parsley

21 September 2011

Last week, fall swept over the city with a single large gust. The temperature dropped about 10 degrees (Fahrenheit) in one afternoon and everyone rushed home – or wished they had – to change into coats and boots for the evening.

But, unlike New York summers that don’t give spring a chance and usually arrive overnight, in New York fall flirts with summer for weeks before finally settling in sometime before Thanksgiving.

So, on this rather grey morning but with full confidence in many more beautiful Indian summer days, here is a great salad that’s crunchy and fresh but also lush with avocado. It takes five minutes to prepare and goes well with a quick lunch – grilled fish, seared steak – or any-way eggs for brunch.

***

2 small seedless cucumbers

1 red pepper

About 12 cherry tomatoes

A small handful flat-leaved parsley

1 avocado

Juice from 1/2 lemon

2 Tbsps very good olive oil

Flaky sea salt

Pinch cayenne pepper

***

Wash the cucumbers, cut them in half lengthways then into 1/2 inch (1 cm) slices and place in salad bowl.

Wash and cut the red pepper in half. Remove the seeds, then cut into 1 inch (2 cm) strips and again into 1/2 inch (1 cm) pieces and place into the salad bowl.

Wash and cut the tomatoes in half, add them to the bowl.

Wash the parsley, pick the leaves from the stems, and coarsely chop the leaves into the bowl.

Slice the avocado in half lengthwise; open it up and remove the stone. With a small sharp knife, cut the flesh of the avocado into 1/2 inch (1 cm) dice, stopping before the skin, then, with a large spoon, scoop out the flesh into the salad.

Dress the salad with the lemon juice, olive oil, salt, and cayenne pepper. Toss, check seasoning, adjust, and serve.

*

Related posts

Lentil and fennel salad with lemon and parsley

Banana cake

10 February 2011

I have had this recipe since I was 7 or 8 years old. I must have been in second or third grade; a friend in my class brought a banana cake to school to celebrate his birthday and offered photocopies of the recipe. I kept the photocopy, and it appears that I have collected recipes ever since. Not obsessively or excessively, but, every once in a while, I wrote down a recipe I liked.

Some years ago I copied these recipes into an orange, cloth-bound dummy book (a sample with blank pages) on the architect R.M. Schindler that I was editing at the time. The recipes compiled in the “Schindler book” (as I now very personally refer to it) are not anonymous, they are not newspaper clippings I fell across and found enticing – they are all linked to memories, and people.

This banana cake reminds me of my first school in France, of Jacob (my school friend) and his family with whom we have not completely lost touch; it evokes their music and a lemon tree in their San Francisco garden that I have seen only in photographs.

Also, it is a very good banana cake. I resisted tweaking the recipe except for the walnuts, as I seem unable to refrain from putting nuts in a cake.

***

10 Tbsps (125 g) butter

3/4 cup (150 g) brown sugar

3 eggs

3 very ripe bananas

1 lemon or orange

1 tsp vanilla extract

1 3/4 cups (200 g) flour (half whole wheat)

2 tsps baking powder

1 tsp sea salt

1 cup (100 g) shelled walnuts (optional)

***

Preheat oven to 350°F (175°C).

In a large bowl, beat the butter until creamy. Add the sugar and beat until light and fluffy. Add the eggs one at a time, beating with a wire whisk to incorporate until smooth.

Mash the bananas well with a fork and add to the butter/sugar/egg mixture.

Grate the zest and juice the lemon (or orange) and add to the batter with the vanilla extract. Mix well.

In a smaller bowl, mix together the flour, baking powder, and salt and add to batter. Stir just enough to blend everything together. Gently stir in the walnuts, if using.

Line a baking pan with parchment paper, butter the paper, and pour in the batter.

Slide into the oven for 45 to 55 minutes, until a knife inserted in the middle of the cake comes out dry. (If, like me, you like the cake to be very moist, take it out of the oven a little sooner, when the tip of the knife is still wet.)

Stollen

9 December 2010

When my grandmother sent me her Stollen recipe twelve years ago she included an old German newspaper clipping titled “On the proper way of handling Stollen.” It prescribed:

◊ According to strict Saxon rule*, Stollen should not be cut open before Christmas eve – 24 December. Modern practice is somewhat lenient, however, and it is now acceptable to start eating Stollen on the first of advent (four Sundays before Christmas).
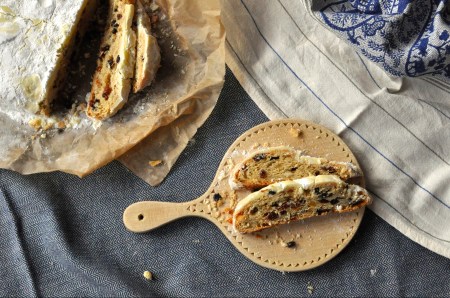
Stollen should never be eaten with a knife and fork – not even a dessert fork. It should be savored by breaking off little pieces with your fingers.

◊ The best beverage to accompany Stollen is a good cup of coffee, possibly tea, but never wine or champagne, for which Stollen would be too sweet.

◊  Stollen should be cellar-cool when eaten, presented on a simple wooden board, and cut with a sharp, unserrated knife.

Historic documents mention that “Man’s character can be determined by the way he eats Stollen.” …

***

Like many Christmas cakes and cookies, Stollen can be made a few weeks in advance.
Makes 2 large Stollen

8 cups (1 kg) flour

4 oz (100 g) fresh yeast

2 cups and 4 Tbsp (500 g) butter

1/2 cup (100 g) and 1 Tbsp sugar

1 cup (250 ml) milk

3/4 cup (100 g) candied orange and lemon peel

2 Tbsp rum

1-2 drops bitter almond oil (or 1 tsp almond extract)

Zest from 1 lemon

1 tsp salt

1 tsp vanilla extract

1 1/2 cups (125 g) slivered almonds

2 cups (300 g) golden raisins

1 cup (200 g) currants (Black Corinth raisins)

For the sugar crust:

1 cup 2 Tbsps (250 g) butter

Plenty of confectioners’ sugar

***

Place a large bowl with the flour in a warm spot until the flour feels warm to the touch.

Crumble the yeast with 1 Tbsp sugar; stir and watch as the mixture becomes liquid.

Melt the butter on a small flame, remove from the heat, and add the cold milk.

Chop the candied citrus peel and sprinkle with the rum and almond extract.

Shape a well in the flour. Pour the remaining 1/2 cup (100g) of sugar, lemon zest, salt, and vanilla extract into the well, add the milk/butter mixture and the prepared yeast. With a large wooden spoon, mix the wet ingredients into the flour using circular movements. Once the dough starts to detach itself from the sides of the bowl, beat with the wooden spoon for 10 minutes.

Knead the almonds, raisins, currants, and candied citrus into the dough. Shape into a ball, cover with a slightly damp cloth, find a warm spot in the house and let rise until the dough has approximately doubled in size, 2 to 3 hours depending on the room temperature.

Divide the dough in 2 and roll out each half into an oval approximately 1 inch (2.5 cm) thick. Fold each oval in half lengthwise, place on a buttered parchment paper on a baking sheet and let rise again for 45 minutes to 1 hour.

Preheat the oven to 300°F (150°C).

Bake the Stollen for 45 to 50 minutes, or until the outside begins to harden but before it starts to brown. Remove from the oven and immediately prepare the sugar crust.

In a small saucepan, melt the butter over medium heat. With a food brush, cover the Stollen with a layer of melted butter. Using a small sieve, sprinkle generously with confectioners’ sugar. Repeat this process 2 or 3 times to form the crust. Wrap immediately.

To store the Stollen, wrap in parchment paper then tightly seal with aluminum foil and keep in a cool dry place. Never wrap Stollen in plastic. A large tin box would be ideal.

*Stollen is originally from Central Germany and famously from Dresden, Saxony

*

Related posts

Christmas cookies | Almond and currant (Corinth raisin) cookies

Christmas cookies | Swiss Anisseed Chrabeli

Quince jelly

3 November 2010

I made quince jelly last year for the first time. It’s not that I don’t sincerely love quince, it’s because I don’t like making jelly very much. To make jelly the fruit is cooked in water, and only the clear juice is used. An awful lot of pulp is wasted in the process. Of course it can be used as a purée to eat with yogurt, but it does not last, and there is only so much quince purée a family can eat in a couple of days. For this reason I don’t make jelly, generally. But last year as quinces appeared at the market I simply couldn’t resist. Having made the jelly (a few pounds of quinces rendered three very small jars), I had a lot of quince pulp on my hands, and dismayed at the idea that it might go to waste, I suddenly thought about membrillo, the Spanish quince paste that pairs so perfectly with Manchego and other hard sheep’s milk cheeses. As it happens, all that is required for quince paste is fruit pulp and sugar.

So making quince jelly has become a perfect excuse to make quince paste (or the other way around?), and I think no recipe for one should ever be published without the other.

***

Quinces

Water

Sugar

***

Making jelly is a fairly long process, but it can be broken up into 2 stages if you don’t have a big uninterrupted chunk of time.

Wash quinces thoroughly to remove fuzzy coat. Cut quinces into quarters or eighths, depending on the size of the fruit so all the pieces have approximately the same size. Place quince pieces in a large, heavy-bottomed saucepan and add just enough water so it reaches the top layer of quinces but does not cover the fruit. Bring to a boil and simmer gently until the fruit becomes soft, stirring occasionally to submerge the fruit on top so it gets a chance to cook through. Poke around to check that all the pieces have softened (quinces will cook through at a different rate depending on how ripe they are – it could take up to 1 1/2 hours). Once all the quince is very soft, remove from heat.

**You can take a break at this point. Leave the quinces in the water, let cool and place in refrigerator once cool for up to 24 hours. If you refrigerate the cooked fruit, you will have to reheat it slightly to release the liquid before starting the next stage.**

Strain the juice through a fine mesh sieve and then through a cheesecloth to remove any impurities. Don’t mash the fruit or squeeze the cheesecloth too much or the jelly will become murky. Reserve fruit pulp for paste (refrigerate unless using immediately).

Measure the juice as you pour it into a (smaller) heavy-bottomed saucepan. For every cup (250 ml) of juice, add 2/3 cup (150 g) sugar. Bring to a boil and simmer, skimming off any foam that forms on the surface. After about 20-30 minutes, check regularly whether the juice has “gelled.” To do this take out a small spoonful and let it cool. Once cold, the juice should have thickened in the spoon, and when you try to pour it the drip is not liquid but heavy, as though it was sticking to the spoon.

Sterilize jars in boiling water for 5 to 10 minutes. As soon as the juice has “gelled,” remove from heat and pour immediately into sterilized jars and close tightly. Keeps unopened for up to a year; once opened should be stored in the refrigerator.

Yogurt

29 September 2010

Making yogurt without a machine is very easy if you accept a slight degree of unpredictability, as yogurt cultures can be temperamental. The tricky part is keeping the yogurt at the right temperature while it sets, and this is where a yogurt maker helps, but it’s by no means indispensable (I don’t own one and I have been making yogurt for years).

Like many people interested in making yogurt at home, I knew it was easy – theoretically. But it wasn’t until I witnessed it that I realized how ridiculously simple it really is. The main steps are very straightforward: heat milk – let cool – stir in a spoonful yogurt  – let set; but of course, the devil is in details.

***
Step 1: Scald milk

In a saucepan, heat milk until bubbles begin to form. Remove from heat.

Step 2: Let milk cool to just above body temperature

Yogurt cultures are most active just above body temperature, at 110°F (43°C). A good way to gauge the temperature without a thermometer (I don’t own one, either) is to place your little finger in the milk and count to 10. It should feel warm but not burn. If the milk is too hot it will kill the yogurt cultures. If it is too cold the yogurt will take forever to set or not set at all.

Step 3: Stir in 1 tablespoon “starter” yogurt per quart (liter) milk

Any commercial plain yogurt works, as long as it contains live cultures (specified in the ingredients).

Using more “starter” yogurt will not help, on the contrary. Think of it as overcrowding; too many live cultures make the yogurt thinner and more sour.

Stir well so the starter yogurt dissolves into the milk.

Step 4: Pour milk into container(s)

Any container will do, large or small, jar, bowl, storage container, etc.

Preheat container(s) with hot water to maintain as much heat as possible. Cover with lid, cloth, or parchment paper (this makes a difference; left uncovered the yogurt doesn’t set as well).

Step 5: Let set in a warm place

The temperature should stay as close as possible to 110°F (43°C). This is the tricky part, the one for which the yogurt maker was invented, but there are a number of other ways to maintain heat. I have tried the following methods, they all work, it’s a question of choosing the one most practical for you:

  • Place containers in a cooler bag (space permitting, add a bottle of hot water to maintain heat)
  • Wrap a towel around the containers and place in the warmest place in the house
  • Preheat oven to 200°F (90°C), turn off oven (very important!), and place yogurt containers in the preheated oven. (Don’t forget the yogurt and accidentally turn the oven on for another use. I must admit it has happened to me. More than once…)

Do not disturb the yogurt until it is set – anywhere from 3 to 12 hours. (It happens that the yogurt doesn’t set, in that case the same milk can be reheated to repeat the process.)

Yogurt keeps in the refrigerator for weeks.