Archive for the ‘Meat / Poultry’ Category

Student food (or weeknight meal) | Chicken and broccoli

28 February 2022

This is one of my favourite weeknight meals, so good and very quick to make, but I’m placing it in the ‘student food‘ category because Leo, who is currently at university, immediately asked me how to make it when he saw a picture I’d posted on instagram. Laggard that I am — I was on holiday after all — it took me a few weeks to send the recipe, in a stream of whatsapp messages, and I am happy to report that the method has already been duly tested and approved.

Here it is, all in one, more easily accessible hopefully than those bits and pieces of a conversation.

Chicken and broccoli recipe
Note: I actually use 2 different types of soya sauce — ‘light soya sauce’ which is quite salty and good to use instead of salt and tamari which is dark (but not the same as ‘dark soy sauce’) and has a deeper taste.

Recipe for 2:
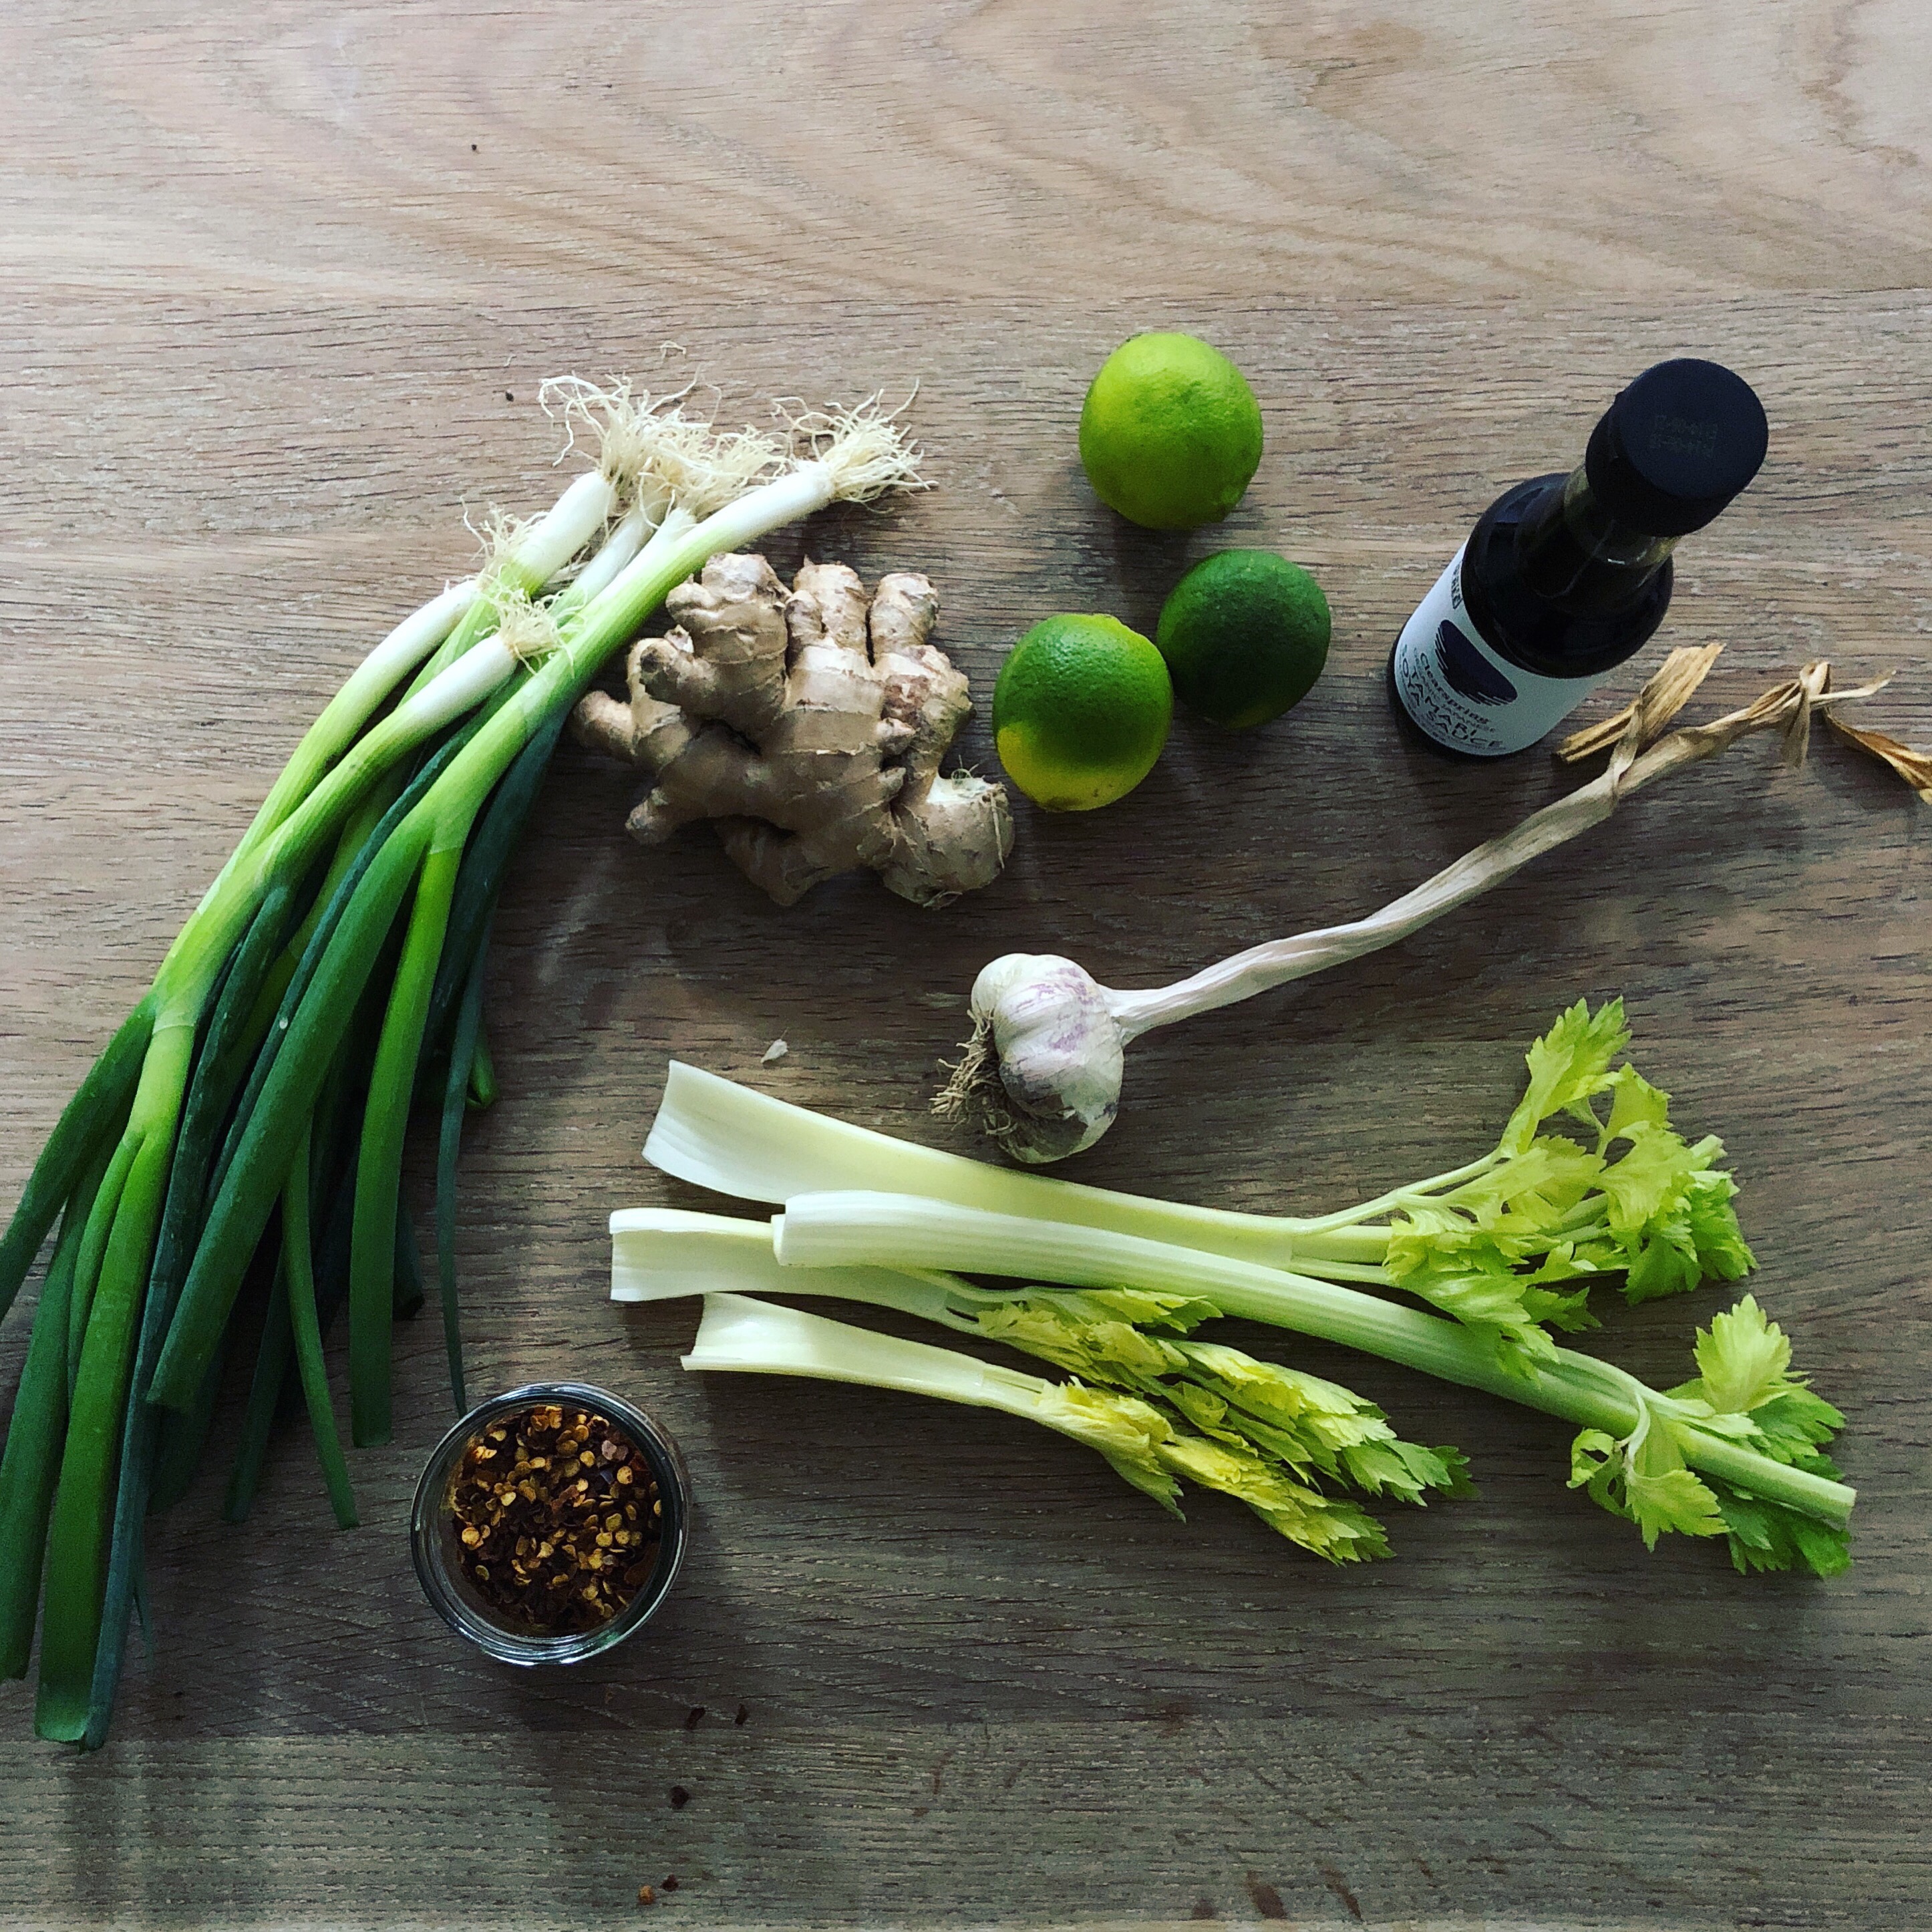
200g tenderstem broccoli (or broccoli which is cheaper)
2 boneless chicken thighs (or breasts, but thighs are juicier)
One 1/2-thumb-size piece of fresh ginger
2 garlic cloves
Oil (any vegetable oil works)
Soya sauce
Rice wine vinegar
Sesame seeds

Trim off the stem ends of the broccoli. If using regular broccoli rather than tenderstem, cut it into small florets. Wash it in cold water.

To blanch the broccoli (optional but better): Put some salted water to boil in a saucepan (like for pasta). Once the water boils, cook the broccoli for just 1 to 2 minutes, then drain the water and add lots of very cold water from the tap to cool off the broccoli quickly. Drain.

Cut the chicken into chunks.

Peel and cut the ginger into matchsticks (=> first into thin slices, then each slice into sticks)
Peel and finely chop the garlic.

Heat the frying pan well, add a little oil. Put in the pieces of chicken and fry on high heat for about three to five minutes until they are nice and brown. Stir occasionally but not too often or they won’t brown.

Now pour some soya sauce and rice vinegar into the pan, about 1 to 2 tablespoons of each, and stir everything together. Add the broccoli. Cook for a few minutes more. =>> If you didn’t blanch the broccoli this will take a few minutes longer.

Move the pieces of chicken and broccoli to one side of the pan to make a bit of space, add a little bit of oil, and fry the ginger and garlic just for a minute (be careful that the garlic doesn’t burn, or it will become bitter).
Stir everything together.

Taste. Add soy sauce and vinegar if you think it needs it.

Sprinkle some sesame seeds.

That’s it! 💚

Notes from the kitchen | Monday chicken legs with spring onions and ginger

15 November 2018

Monday night. Eternal, tedious, domestic conundrum — what to make for dinner? Feeding six requires labour, always. The simplest thing — grating cheese for all the pasta — takes a while.

Forever torn between fantasies of heady stews and lack of time, I go into the butcher’s dreaming of oxtail and grab chicken legs instead. It’s the quickest path to a braised (style) dish. It requires little foresight or planning, barely a thought. There will at the very least be garlic and lemon in the house.

As it happens, today we also have spring onions and celery, ginger and tamari. What began as a resignation, an easy way to finish odds and ends at the bottom of the fridge, has become a legitimate meal, an instant favourite. And with Balthasar’s retro / disco playlist in the background, there may even have been some dancing around the kitchen table.

Chicken legs with spring onions and ginger
Serves 6

6 chicken legs (whole or separated into thighs and drumsticks)
A large chunk of ginger
One bunch — 6 or 7 — spring onions (scallions)
4 or 5 celery stalks
1 small lemon or lime
1 whole head of garlic
Neutral flavored oil
Toasted sesame seed oil
Light soy sauce (or salt)
Tamari soy sauce
Rice vinegar

Preheat the oven to 175°C (350°F).

Remove the chicken from the refrigerator so it has time to come to room temperature.

Prepare the ‘vegetables’:
Peel the ginger and slice it into matchsticks.

For the spring onions, cut off the ends, remove one outer layer, wash, and cut into three.

Top and tail the celery stalks, wash, and cut into pieces of similar length to the spring onions.

Wash, halve lengthwise, and thinly slice the lemon (or lime) into half moons.

Smash the head of garlic with your palm to open it up. Crush each clove with the side of a large knife and remove the skin, which will come off easily.

Roasting:
Pour some oil at the bottom of an oven dish large enough to fit all the pieces of chicken with space to spare. *The pieces should not be too crowded or the skin wil not become crispy.* Scatter all the vegetables at the bottom of the pan, toss with a little oil, and roast in the oven for about 15 minutes.

Coat the chicken legs with sesame sauce.

Once the vegetables have been roasting for about 15 minutes, add the chicken legs to the pan and season everything with a few hits each of light soy sauce, tamari, and rice vinegar.

Roast the chicken for 40 to 45 minutes, basting occasionally with the juice, until brown and crispy on the outside and fully cooked (i.e. juices run clear) inside.

If possible, let the chicken sit for a few minutes. Serve with rice.

Surprisingly manageable duck confit

28 April 2017

IMG_6306

‘Why on earth make duck confit in the first place?’ Fair question. ‘Why on earth make duck confit again?’ Even more to the point. And again?! Because there is a happy ending.

Many moons and about a decade ago I made duck confit. Why? Well, I was in New York, where confit duck is not, as in France, available on every supermarket shelf. I must have been in an experimental mood. And I certainly had no idea what I was getting myself into. As I remember the experience — faintly (the worst ones fade) — I see endless vats of rendering, handling, splashing, filtering duck fat (it was actually probably goose fat). It took hours, days, perhaps weeks? In the end the thighs were much too salty.

And yet, I did it again. — Why?

IMG_0794.JPG

Perhaps because so much time had gone by that I had glossed over the experience? Because I was again/still in a country where duck confit is somewhat elusive? Because I don’t like to leave things on a frustrating experience?

Because in April Bloomfield’s book A Girl and Her Pig there is a duck confit recipe that fits on one page.

It works. It’s not that hard. It’s worth the adventure.

IMG_0793

Duck confit recipe from A Girl and Her Pig by April Bloomfield adapted for 6 duck legs. The process takes 2 days and is best made some time in advance.

36 peppercorns
36 juniper berries
8 dried pequin chilies or pinches of red pepper flakes
1/2 small cinnamon stick
Small handfull fresh thyme
10 medium garlic cloves
1/3 cup coarse sea salt
6 duck legs
About 1.4 kg duck (or goose) fat

In a mortar, crush together the peppercorns, juniper, chilies, and cinnamon. There should be fine and coarse bits. Add the thyme leaves picked from the stems and the garlic and crush some more to obtain a coarse paste. In a small bowl, mix the spice mixture with the salt.

Place the duck legs in a shallow dish and rub the salt/spice mixture all over the legs. Cover with plastic wrap and leave in the refrigerator overnight.

The next day, very slowly heat the fat in a small pot that will perfectly fit the duck legs (I used a 10″/25cm pot). Rinse the duck legs and pat them dry with a paper towel, then carefully put the legs in the fat. The legs must be completely submerged — if they are not, use  a smaller pot or add a bit more fat. Cook on extremely low heat for about 2 1/2 hours. There should be barely a simmer. Adjust the heat as necessary.

Remove the pot from the heat and leave the duck legs in the fat to cool completely before placing in the refrigerator, covered with a lid. The legs submerged in fat will keep for a few weeks.

When ready to eat, remove the legs from the congealed fat, and carefully scrape off as much of the fat as possible. Thoroughly heat a heavy skillet/frying pan, add a few generous spoonfuls of the duck fat, and fry the legs over high heat, skin side down, until deliciously crispy. Turn around and fry the other side of the legs too. Serve immediately.

Crispy duck confit is best served with roasted potatoes and a salad of bitter greens (traditionally frisée, but also escarole, radicchio, arugula, etc…).

Slow-cooked pork belly with star anise, cinnamon, ginger and cloves

12 February 2015

IMG_8474

Imagine unctuously slow-cooked pork belly infused with the intoxicating aromas of star anise, cloves, cinnamon, ginger, chilli, and coriander. It doesn’t get much better than this.

The recipe is a brilliant one by Skye Gyngell, to which — if I may — I did make one substantial improvement: crackling.

The initial method slices the gently simmered pork and browns each individual rib in a pan. I found this impractical. I’d much rather be clinking glasses with friends than browning meat in the kitchen. Also, dare I serve pork belly with no crackling? So I improvised a little and shot two inconveniences with one rather practical idea: rather than searing the meat, why not slide it into the oven for a second low and slow roasting. Boom!

Pork belly with star anise, ginger, cinnamon and cloves
Adapted from A Year In My Kitchen by Skye Gyngell. The process is a lengthy one but hardly requires any hands on work. Plan with a minimum of 4 hours before serving time.

2 kg piece of best quality pork belly

2 cinnamon sticks

3 star anise

1 tsp cloves

1 red chilli

4 cm (1 1/2 inch) piece fresh ginger root

6 garlic cloves

2 Tbsps coriander stems (and roots if available)

100 ml (1/2 cup) tamari soy sauce

75 ml (1/3 cup) maple syrup

Sea salt and black pepper

Place the pork belly in a pot large enough for it to lie horizontally quite snugly. Add cold water to cover. Bring to the boil, then immediately remove from the heat, drain the water, and rinse out the pot.

Return the pork belly to the clean pot (skin side up), cover again with cold water, and add the cinnamon, star anise, cloves, chilli, peeled and roughly sliced ginger, peeled garlic cloves, and roughly chopped coriander stems (and roots). Bring to the boil then turn the heat down to very low, and let the pork simmer gently for about 1 1/2 hours.

With a pare of tongs carefully take the meat out of the pan and place it onto an ovenproof dish. Season with salt and pepper. Reserve the liquid which will be made into an incredible sauce (see below).

**The meat can rest a while or be refrigerated overnight at this point. Preferably take it out of the refrigerator about an hour before using again.**

Approximately 2 hours before planning to serve, place the pork belly in a 300°F (150°C) oven and roast for 1 1/2 hours. Check after one hour; if the skin isn’t crispy enough, increase the temperature to 375°F (190°C) for the last 20 to 30 minutes. Take the pork out of the oven and let rest for at least 20 minutes.

Meanwhile, to make the sauce, add the tamari and maple syrup to the fragrant cooking water, turn the heat back on to high, and let it boil away for a good half hour until the liquid has reduced by about half to become a dark and rich sauce. When it has acquired to the desired consistency, remove from the heat and strain out the spices, pouring the sauce into a smaller saucepan ready to be easily reheated later.

Serve the pork belly with the thoroughly reheated, piping hot sauce.

A good steak with anchovy and herb butters and shallot confit

15 May 2014

photo(18)

Key, of course, is the quality of the meat. Beef should be grass-fed and dry-aged. To say I choose my homes according to their proximity to a good butcher is exaggerated, but we’ve been lucky for a while now, with, for years, excellent meat just a few blocks away. There was Ottomanelli in the West Village, Harlem Shambles uptown, and, here in London, we live close to another great butcher, Godfreys.

The cut is important, too. Meat on the bone is typically more flavorful, and thick cuts (an inch and a half at least) are much easier to cook to perfection: very brown and crisp on the outside but perfectly rare in the center.

There are debates over whether steaks should be seasoned early or whether salt left on the meat absorbs some of the moisture. I’ve decided to settle into the camp that favors early seasoning, allowing the salt to seep into the cut. Since meat should be brought to room temperature before cooking, I take the steaks out of the refrigerator about one hour before dinner, season them generously with coarse salt and freshly ground pepper, and let them sit a while.

It is useless to try to give a cooking time. Every steak is different, depending on the cut, its thickness, its initial temperature. I’ve found that a cast-iron skillet works best, and it should be very hot before the meat is added. A combination of butter and olive oil in the pan is good, as the butter is delicious and won’t burn as quickly together with the olive oil. Ideally one could add herbs to the rendered fat and baste the steak as it cooks.

Sear the meat on very high heat, turning it over once the first side is evenly brown. The steak is perfect when the outside is brown and crisp, like a crust, and the meat has contracted, but just barely. Not too much or it is overcooked.

Like all meat, steak needs to relax a little before being cut; about ten minutes, just the time needed to get the rest of the meal on the table.

Serve the steak with the butters, shallot confit, and some strong mustard.

IMG_4120

IMG_4119

Herb and anchovy butter
These must be made a least an hour ahead, and easily the day before.
I make one butter with anchovies, parsley, and basil, and the other with just herbs and sea salt.

250g good unsalted butter

A generous handful of parsley

Small bunches each of basil and chives

A dozen anchovies in oil

1/2 teaspoon coarse grey sea salt

Cut the butter into two equal parts, place each in a small bowl, and let sit at room temperature until it becomes soft and easy to work with (probably about an hour).

Wash and shake the herbs dry. Pick the parsley and basil leaves from the stems.

Separate the herbs into two groups: one with half the parsley and a few basil leaves, the other with approximately equal amounts of parsley, basil, and chives.

Finely chop each group of herbs.

Drain as much oil from the anchovies as possible, and chop finely.

Using a fork, mix one of the softened butter with the anchovies, parsley, basil; the other with the parsley, basil, and chives, and the salt. Mix each well until the butter is homogeneously speckled with the herbs.

Transfer each piece of butter into a small serving bowl, even out the surface, and let cool in the refrigerator for at least an hour. The butter will keep for a while, though it will be best for a couple of days.

IMG_4134

Shallot confit

3-4 large shallots

Olive oil

Small sprig fresh thyme

Small sprig fresh rosemary

One bay leaf

Sea salt

Peel and slice the shallots into thin-ish slices. (The shallots can be cut either crosswise or lengthwise.)

Place in a very small saucepan with enough olive oil to comfortably blanket the bottom of the pan. Add the herbs and a good pinch of salt.

Cook on very low heat, staying close and stirring regularly, until the shallots are a deep golden. **In case the bottom does burn, quickly transfer the rest of the shallots to a different pan so the burnt flavor doesn’t tarnish the confit.**

Let cool a little and remove the herb stalks before serving.

The confit can be made ahead and kept in the refrigerator but must be slightly reheated before serving, just beyond the point where the oil isn’t congealed to awaken the flavors.


%d bloggers like this: